WB200 WIRE BONDER

JFP Microtechnic®

The WB-200 series is a multi-purpose semi-automatic wire bonding tool, suitable for wire bonding in research and development, prototyping and small-batch production.

The WB-200 also offers full manual Z-step control, which is used for prototyping, sample trial production or simple maintenance without the need for mechanical setup...

It is a new generation of JFP wire bonding machine, featuring more powerful functions and a sturdier, more reliable mechanical concept.

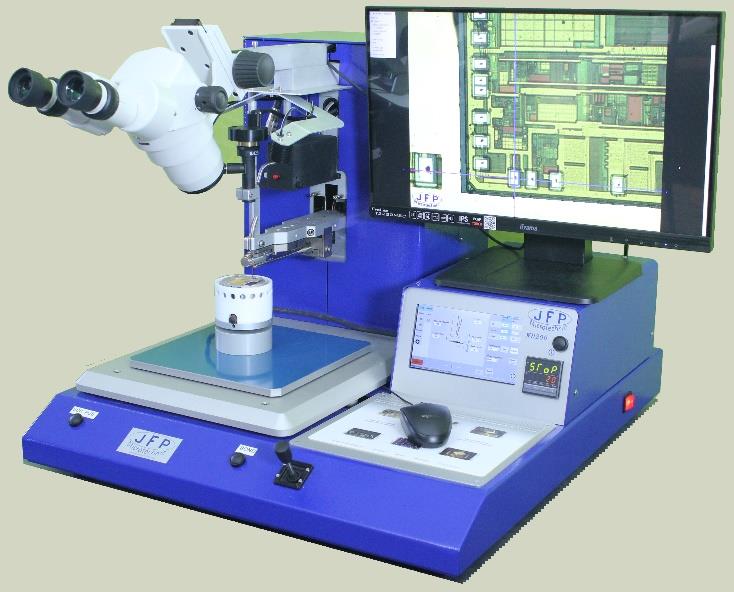
System

Bonding arm length: 165 mm (6.7 inches)

Depth access key head

Motorized Z-axis bonding head (true vertical movement, Z stroke = 40 mm, Z accuracy = 1 μm)

Motorized X and Y axes: 50 x 50 mm, X and Y accuracy of 2 μm

Mouse Driver

Ultrasonic Power: 0.2 to 10 Watts (Sensor: WBT140: 62 kHz, Length 185 mm, Other frequency requests available)

Motorized Upper and Lower Fixtures

Automatic Motorized Spool: 2"

Electronic Ignition Shutdown (Ball Loss System Detection)

Touchscreen Interface: 7” Simatic (Storage: 50 programs; programs can be saved on a USB flash drive, with no limitations)

Integrated Temperature Controller


Standard Modes

SEMI-AUTO Binocular Bonding Mode

Manual Z Bonding Mode

UHD Vertical Camera Bonding Mode

Optional Accessories / Optional Devices

Vertical Camera, Parallax-Free

Field of View, Fine Compatibility

Digital Crossing, Square or Circular Pattern


Heating Stage

HP-60 Heating Stage(Diameter: 60 mm)

HP-100 Heating Stage(Dimensions: 100 x 100 mm)

HP-150 Heating Stage(Dimensions: 150 x 100 mm)

HP-200 Heating Stage(Dimensions: 200 x 150 mm)

TH-TC Thermocouple Heating Stage

Sample Chucks

The Tencor P-7 is equipped with a variety of stages to support application requirements. The standard configuration is a universal vacuum stage with locating pins, which enables precise positioning of samples ranging from 50 mm to 150 mm. The universal stage supports warpage and stress measurement; it uses a 3-point positioner to hold the sample in the central position, ensuring accurate warpage measurement. Additional options are available, including stages for solar panel samples and a 200 mm universal stage.

Isolation Tables

The Tencor P-7 offers options of benchtop vibration isolation platforms and standalone vibration isolation platforms. The GraniteIsolator™ series provides benchtop systems that combine granite with high-quality silicone pads to deliver passive vibration isolation. The Onyx series benchtop vibration isolation systems use pneumatic vibration isolation platforms for passive vibration isolation. The TMC 63-500 series isolation platforms are standalone steel-framed platforms that utilize pneumatic vibration isolation platforms to achieve passive vibration isolation.

Step Height Standards

The Tencor P-7 uses thin and thick film NIST-traceable step height standards offered by VLSI Standards. The standards feature an oxide step on a silicon die mounted on a quartz block, or an etched quartz step with a chrome coating. A step height range of 8nm to 250µm is available.

Apex Analysis Software

The Apex analysis software enhances the standard data analysis capabilities of the Tencor P-7 through an extended suite of components featuring flattening, filtering, step height, roughness, and surface topography analysis technologies. Apex supports ISO roughness calculation methods as well as local standards, such as ASME. Additionally, Apex functions as a report generation platform, enabling the addition of text, annotations, and pass/fail criteria. Apex supports 11 languages.

Offline Analysis Software

The Tencor P-7 offline software has the same data analysis and recipe creation capability that exists on the tool. This enables the user to create recipes and analyze data without using valuable tool time.

Pattern Recognition

Pattern recognition uses pre-taught patterns to automatically align the sample. This enables fully automated measurements for enhanced measurement stability by reducing the impact of operator error. Pattern recognition combined with advanced calibrations reduces stage positioning error and enables seamless transfer of recipes between systems.

SECS/GEM和HSMS

SECS/GEM and HSMS communications support factory automation systems and enable remote control of the Tencor P-7. Measurements results are automatically reported to host SPC systems, plus alarms and key calibration/configuration data. The Tencor P-7 is compliant with SEMI standards E4, E5, E30, and E37.

Step Height

The Tencor P-7 is capable of measuring 2D (two-dimensional) and 3D (three-dimensional) step heights ranging from the nanometer to 1000 µm scale. This enables quantification of the thickness of materials deposited or removed in processes such as etching, sputtering, secondary ion mass spectrometry (SIMS), deposition, spin coating, chemical mechanical polishing (CMP), and other related processes. The Tencor P-7 features constant force control, which dynamically adjusts to apply the same force on the sample surface regardless of the step height. This maintains excellent measurement stability and allows for precise measurement of soft materials, such as photoresist.

Texture: Roughness and Waviness

The Tencor P-7 measures two-dimensional (2D) and three-dimensional (3D) textures, and quantifies the roughness and waviness of samples. Software filters split the measurement results into two parts: roughness and waviness, and calculate parameters such as root mean square (RMS) and roughness.

Warpage and Shape

The Tencor P-7 can measure the warpage of 2D shapes or surfaces. This includes the measurement of wafer warpage caused by material mismatches between different process layers during component manufacturing, such as multi-layer deposition in the production of semiconductor or compound semiconductor devices. The Tencor P-7 can also measure the height and radius of curvature of curved structures (e.g., lenses).

Two-Dimensional (2D) and Three-Dimensional (3D) Thin Film Stress

The Tencor P-7 is capable of measuring the stress generated during the manufacturing of devices with multiple process layers, such as semiconductor or compound semiconductor devices. A stress stage is used to support the sample in a central position for accurate measurement of surface warpage. Stress calculation is achieved by analyzing the topographic changes resulting from processes like thin film deposition, followed by the application of the Stoney equation. 2D stress is measured via a single scan of the sample diameter (which can be up to 150 mm) without the need for stitching. 3D stress is realized using a combination of 2D scans, where the sample stage rotates between multiple scans to measure the entire sample surface.

Defect Review

Defect detection can be used to measure the surface topography of defects, such as scratch depth. Defect detection tools identify defects and write their position coordinates into a KLARF file. The defect detection function reads the KLARF file, aligns the sample, and allows users to select defects for 2D or 3D measurement.

related news

contact us

我们希望了解您的需求,请填写以下表单并提交

Your Name
邮箱地址
联系电话
您的需求